Monday, March 12, 2012

custom 40g stand

I decided to build a custom stand for my 40g breeder today. I'm tired of having a metal frame and I want to enclose the sump so that my cat won't jump in it; can't really enclose a metal frame and its hard to mount power strips to a metal frame.
Went and bought all my supplies at the local lumber yard and they cut all the 2x4s for me. The stand is 37"x19"x28". I got 4 37" pieces, 10 16" pieces, 4 28" pieces, and 8 21" pieces and a box of 100 #8 2.5" wood screws. Total was $38. Not bad considering my current stand cost me $90 and the only wood stand for a 40 breeder I was able to track down was $180.

The supplies.

Frame of the stand. I built two identical frames, top and bottom, using two 37" pieces and two 16" pieces.

Got the legs put on the frames. The legs are 28" tall.

I used eight more 2x4s to brace the corners so that the weight of the tank is held up by eight braces, four legs, and 32 woods screws instead of just four flimsy legs.

Added bracing on the bottom to support the sump and bracing on the top inside the legs to prevent against any bowing. 

All I have to do now is skin the entire stand, add the sump, mount the power bars, and mount the metal halide ballast somewhere in here.

Sump build: leak testing

Moment of truth this morning. I leak tested the individual compartments of the sump. I am proud to say that everything stayed in place and held water without any leaks. None to shabby for my first time building a sump.

Skimmer and bubble trap section. Return section stayed dry!

Refugium section. Return section stayed dry again!

Full sump shot.

Friday, March 9, 2012

My First Sump

I have decided to revamp my 40g breeder reef tank. This time I am going to do things right. I've made a lot of missteps in the past and I intend to correct them. First of all, I'm decided to step away from SPS (small polyp scleractinian) corals and focus solely on LPS (large polyp scleractinian) corals and chalice (
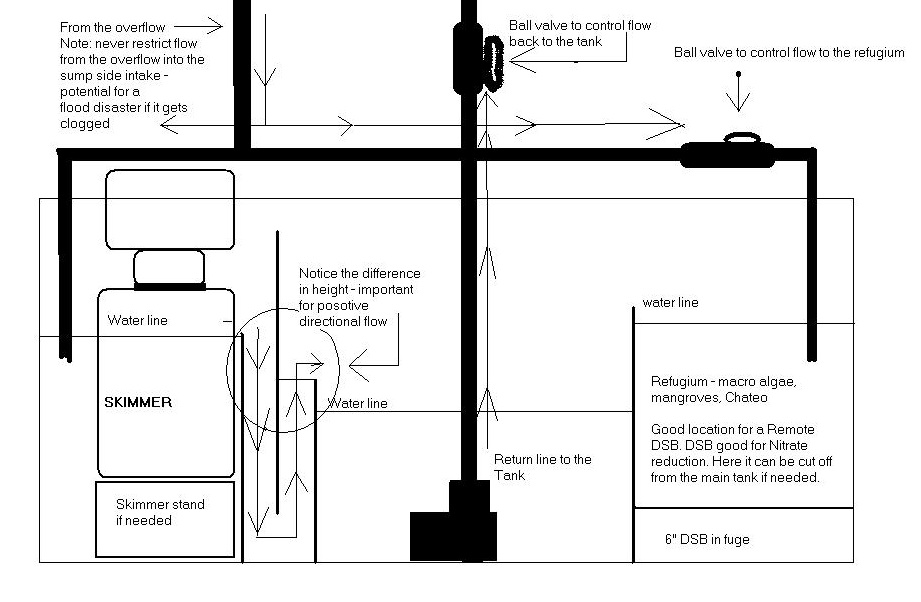
Echinopora) corals. The reason for this is I'm tried of spending hundreds of dollars on Acroporas and then having them die on my suddenly. LPS I know I can keep alive and chalices are low light so I would like to give them a try. The first step to my tank revamp is designing and building my sump. I've never had a sump before. I assumed they were unnecessary when I originally set up the 40, 6 months later, I see why everyone has one. I'm expecting this to make a huge difference to my tank. I have purchased an Eshopps PF-300 overflow kit and directional U-tube to plumb the tank and I found these designs online that will help me create my sump:


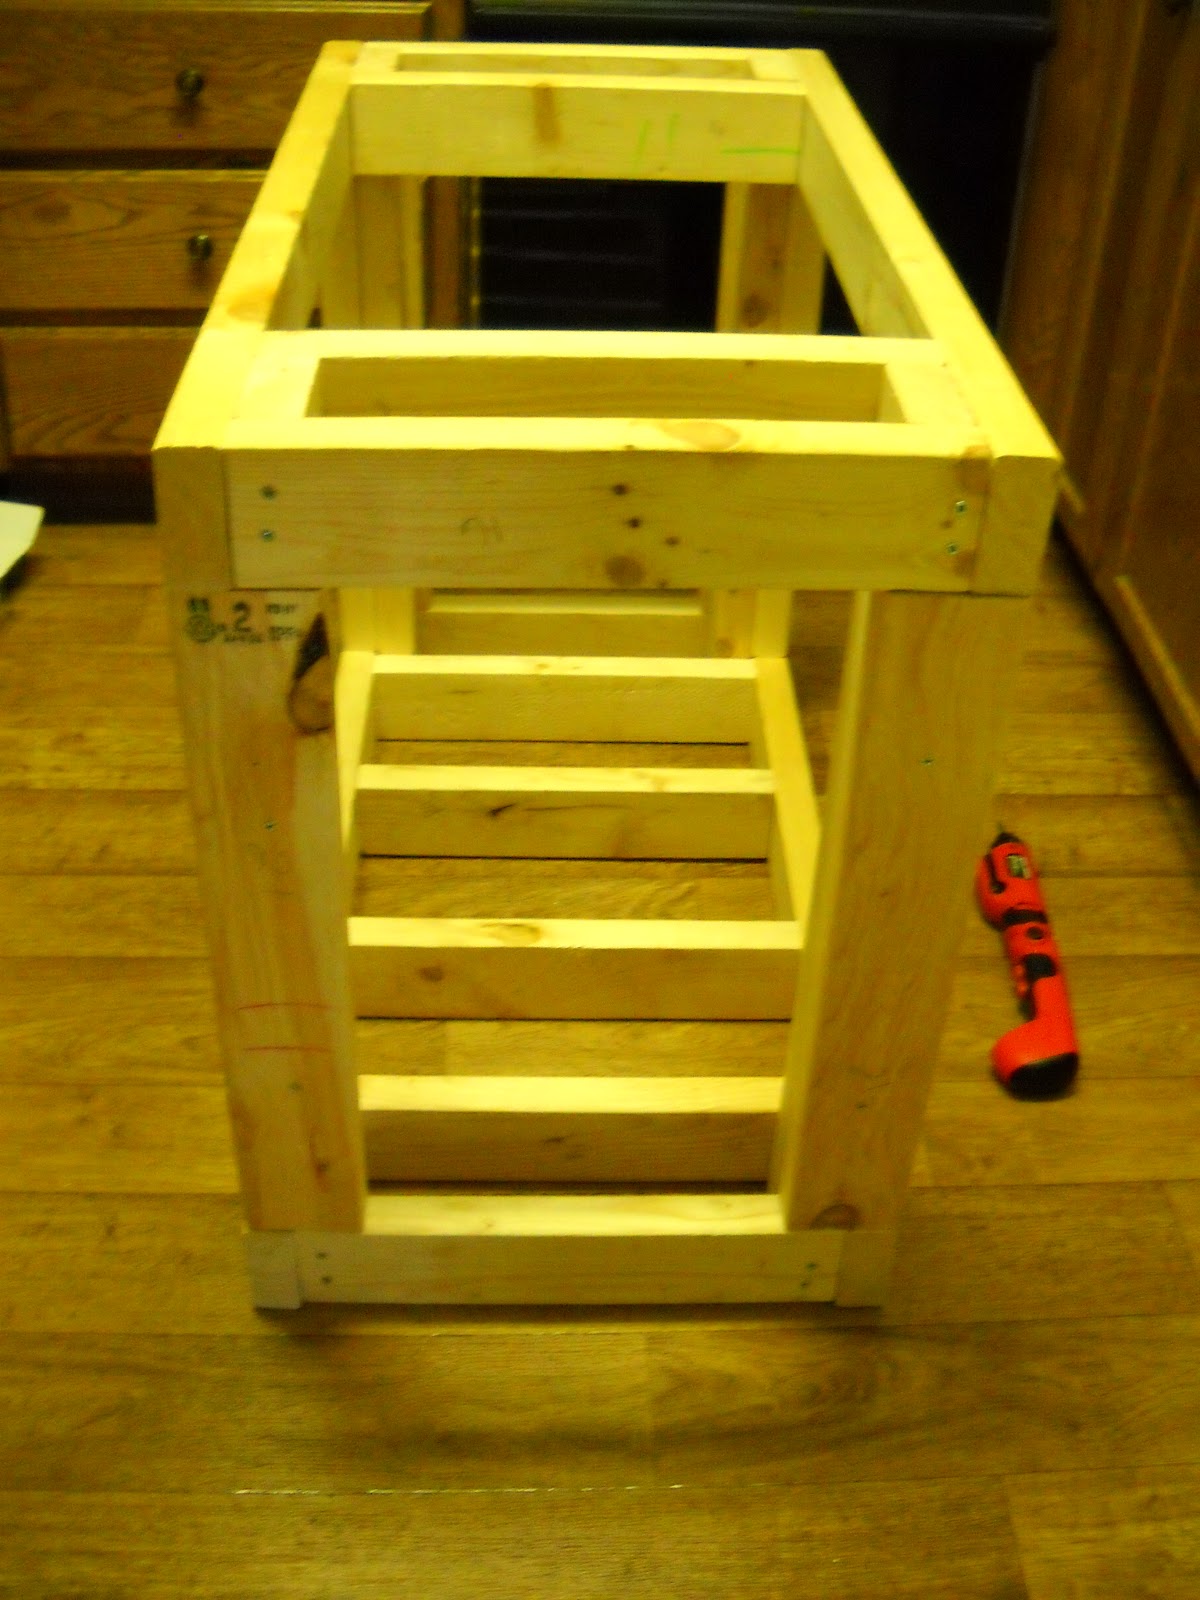
The sump will be made from a 20g long tank. I'm keeping my current skimmer which is a Coralife Super Skimmer 65. The return pump is a Marineland 1800 submersible pump. The first chamber is the skimmer section. Next is the bubble trap. The baffles are spaced 1.5" apart and the middle baffle is 1.5" off the floor of the tank. The middle section houses return pump and is 9" wide to allow enough volume to ensure the pump wont run dry. Finally there is a remote refugium that will filled separately and allow for a place to grow macroalgae and copepods as well as create a deep sand bed for nitrate removal and extra space for live rock. Here are some pictures from my actual build.
Planning stages. measuring out wall placement and checking that the tank is level before the install

First wall installed. The duct tape is to keep the wall up while the silicon was being used.

It turns out that 4 standard CD cases are exactly 1.5" and work really well for spacing out the baffles and provide something to listen to while building.

Two walls installed and enough room for the skimmer to operate.

My silicone skills are pretty sloppy. It's my first time so I'm not bothered as long as it holds water.

All three baffles that form the bubble trap are in place now. Still using CD cases to space out the walls.

Over head shot.

Refugium wall. Behind this will sit 6" of sand bed, live rock, and marcoalgae. This section will be lit opposite of the display tank to maintain pH stability.

 All the walls are installed. Now I just to let them cure for 24 hours before I leak test the sump.

Monday, February 27, 2012

Tearing Down the 40 breeder

Tomorrow I start to tear down my 40g tank in anticipation for my new 90g tank. In the interim between now and when the tank is complete I will be running the 40 solely as a frag tank. I have been battling hair algae and various other problems in the tank. I wasn't planning on putting my current fish in the 90 and I can't afford to run two reef tank so I am striping it clean. I built a large 1'x2' frag rack that will go in the 40 and I will be able to grow out my frags in peace and safety and the algae problems should subsist due to the radically decreased bioload. The only things I'm keeping besides my corals are my tiger conch and my cleaner shrimp.


I will have one new addition though, a Magnificent Foxface that I am getting tomorrow. The Mag will be a permanent resident of my 90g and in the meantime my hope is if any hair algae does come back he can graze on it and keep it to a minimum; plus I got a killer deal on it.

The 90g reef


Well, if its not one project with me its another. The 55g high-tech planted tank is done now so what else is there to do but buy another tank. So this morning I scored a 90g tank at a pawn shop for dirt cheap. $50 for a pre-drilled, dual corner overflow, mini-monster. I can already tell you that this build is going to be a big one and its gonna take some time. Here's the problems I already know of:

-Tank looks terrible, needs to be deep cleaned, badly
-Who ever pawned it had the "smart" idea of sealing the overflow holes in the bottom of the tank and removed the overflow boxes 
-Aqueon, AllGlass, Marineland, and GlassCages will not sell me aftermarket overflow boxes, I already called them.
-I have no clue how old this tank is so I'm going to reseal the entire thing so I don't wind up with 90g of water in my carpet.
-The upper rim is cracked. Not a big deal and its on the back of the tank.
-The front pane has a chip in it. Possibly not the safest thing in the world.
-It did not come with a stand.
-I will eventually be building my first sump for this project.
-I'm sure more problems will come to light as I get deeper into this project.


Thursday, January 19, 2012

Saltwater Revamp

So here's what's been happening in my tank lately. The 40 breeder reef is now 5 months old and I am starting to see some of the effects of "mistakes" from the set up of the tank. Not really mad at myself, it's my first salty tank and there are bound to be missteps and a bit of wasted money. I've been using tap water for the last 5 months, I figured no big deal. That was problem number 1. Ive had all sorts of algae blooms and my phosphate is a little over 0.25ppm. My neon green birdsnest, which I loved, started to die from the bottom up. I think this was a result of the phosphates and poor lighting, only 2 39w hoT5s. I was able to frag the birdsnest out before the necrosis got too bad. I got 4 large frags off of it. The smallest one died from tissue death but I was able to sell off the other 3. The main colony started to get hair algae on the skeleton and bubble algae on the base, so I trashed it.
New tank lights (Coralife Aqualight Pro)

Old lights (ZooMed 36" dual hoT5)

Now, I'm trying to fix everything. I bought a 150w hqi/power compact light from Coralife and I'm in the process of switching to RO/DI water. So far I've changed out 10g with it and my phosphates have already dropped a bit. I picked up (maybe prematurely) two acroporas; one is a purple plasma and the other is idk. It's orange. I'm gonna call it a creamsicle acro is ever frag it out and sell it. So far I've seen polyp extension on both. 
Purple Plasma acro

"Creamsicle" acro

Next step, is to remove the turbo snails from the tank, they are bulldozers of the snail world, and replace them with astrea or cerith. After that I'm going to think about changing the aquascaping even though I am very proud of how it looks it's just not conducive to having lots of corals in the tank. Also I want to get my softies off to the sides and the light intensive corals into the middle.